Buy Digitizing Bundles and Save MoreBuy Digitizing Bundles and Save MoreBuy Digitizing Bundles and Save MoreBuy Digitizing Bundles and Save MoreBuy Digitizing Bundles and Save MoreBuy Digitizing Bundles and Save MoreBuy Digitizing Bundles and Save MoreBuy Digitizing Bundles and Save MoreBuy Digitizing Bundles and Save MoreBuy Digitizing Bundles and Save MoreBuy Digitizing Bundles and Save MoreBuy Digitizing Bundles and Save MoreBuy Digitizing Bundles and Save MoreBuy Digitizing Bundles and Save MoreBuy Digitizing Bundles and Save MoreBuy Digitizing Bundles and Save MoreBuy Digitizing Bundles and Save MoreBuy Digitizing Bundles and Save MoreBuy Digitizing Bundles and Save MoreBuy Digitizing Bundles and Save More
Buy Digitizing Bundles and Save MoreBuy Digitizing Bundles and Save MoreBuy Digitizing Bundles and Save MoreBuy Digitizing Bundles and Save MoreBuy Digitizing Bundles and Save MoreBuy Digitizing Bundles and Save MoreBuy Digitizing Bundles and Save MoreBuy Digitizing Bundles and Save MoreBuy Digitizing Bundles and Save MoreBuy Digitizing Bundles and Save MoreBuy Digitizing Bundles and Save MoreBuy Digitizing Bundles and Save MoreBuy Digitizing Bundles and Save MoreBuy Digitizing Bundles and Save MoreBuy Digitizing Bundles and Save MoreBuy Digitizing Bundles and Save MoreBuy Digitizing Bundles and Save MoreBuy Digitizing Bundles and Save MoreBuy Digitizing Bundles and Save MoreBuy Digitizing Bundles and Save More
Why Some Embroidery Designs Look Sharp While Others Look Messy: The Digitizing Difference

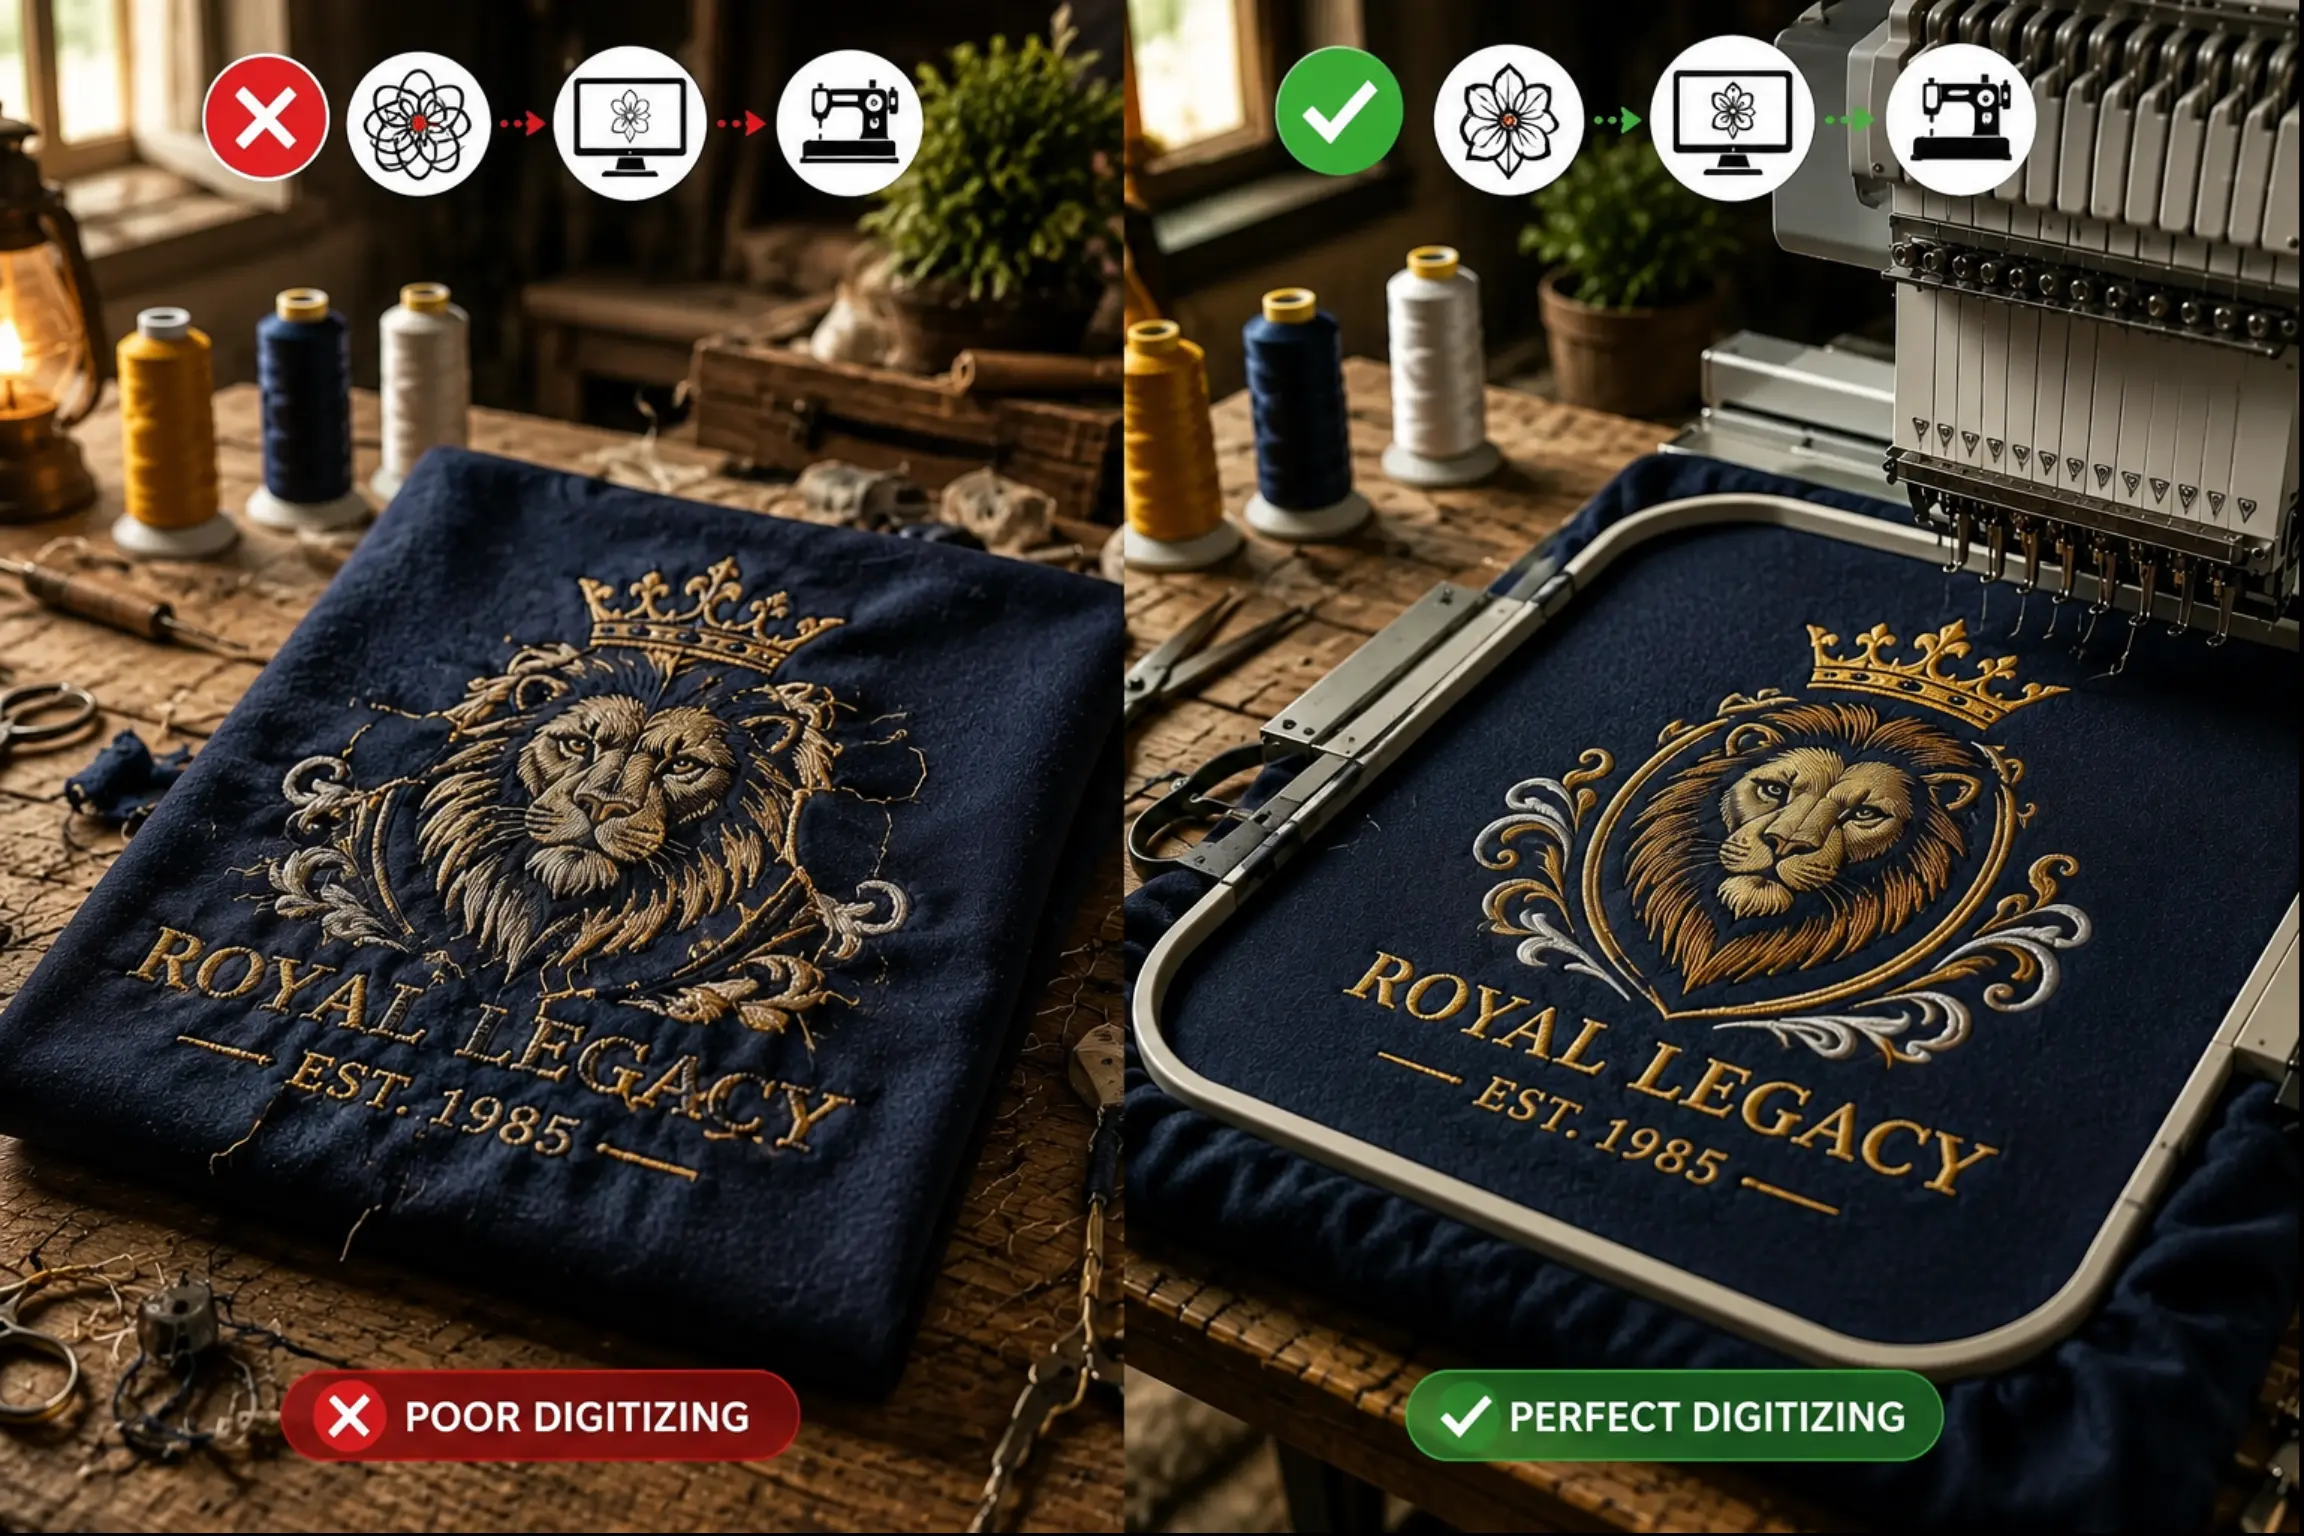
A beautiful embroidery design can completely transform a garment, cap, jacket, uniform, bag, or promotional product. But sometimes, two embroidery machines can stitch what appears to be the same logo and produce dramatically different results. One version looks clean, sharp, professional, and premium, while the other looks messy, distorted, uneven, or poorly finished.
The difference is often not the embroidery machine.
It is the digitizing.
Professional embroidery starts long before the needle begins moving. An embroidery machine cannot simply look at a JPG, PNG, or other artwork and understand how that image should be stitched. The artwork must first be converted into a properly structured embroidery file containing detailed instructions about stitch types, stitch direction, density, sequence, underlay, compensation, and more.
This process is known as embroidery digitizing, and it plays one of the biggest roles in determining how sharp and professional the finished embroidery will look.
At ASH Digitizing, we understand that successful embroidery is not simply about converting artwork into stitches. It is about creating a stitch structure that works with the design, fabric, thread, embroidery machine, and final application.
What Is Embroidery Digitizing?
Embroidery digitizing is the process of converting artwork into a digital embroidery file that an embroidery machine can read.
A normal image contains pixels, lines, shapes, colors, and other visual information. An embroidery machine, however, needs completely different information.
It needs to know:
- Where the needle should enter the fabric
- Where the needle should move next
- Which stitch type should be used
- How dense the stitches should be
- Which direction the stitches should follow
- Which section should be embroidered first
- Where the thread should stop or change
- How the design should compensate for fabric movement
- What type of underlay should be used
A professional digitizer essentially translates visual artwork into a carefully planned sequence of stitches.
That is why simply using an automatic image-to-embroidery conversion tool does not always produce professional results.
Why Does Some Embroidery Look Sharp and Other Embroidery Look Messy?
There isn’t usually one single reason.
Embroidery quality is affected by several interconnected factors. A design can look messy because of incorrect stitch density, poor sequencing, inadequate underlay, unsuitable stitch types, incorrect sizing, insufficient pull compensation, poor registration, or simply because the artwork was not properly prepared for embroidery.
The most important factors include:
- Stitch density
- Stitch direction
- Underlay
- Pull compensation
- Stitch sequencing
- Stitch type
- Design size
- Fabric type
- Thread selection
- Proper testing
Let’s look at each one.
1. Stitch Density Can Make or Break an Embroidery Design
Stitch density refers to how closely stitches are placed within an embroidered area.
It may seem logical that more stitches would automatically produce better coverage. However, excessive stitching can actually make embroidery worse.
Too much density can cause:
- Puckering
- Excessive stiffness
- Thread buildup
- Needle stress
- Fabric distortion
- Increased production time
- Higher thread consumption
On the other hand, insufficient density can leave gaps and allow too much of the fabric to show through.
Professional digitizing aims for the appropriate stitch density, rather than simply using as many stitches as possible.
The ideal density depends on several factors, including fabric, thread, stitch type, design size, and embroidery application.
Why Density Must Be Adjusted for Fabric
A dense design that works well on a stable jacket may not work the same way on a lightweight T-shirt.
Stretchy fabrics move differently from woven fabrics. Fleece behaves differently from cotton. Towels have a completely different surface structure.
A professional digitizer considers these differences when creating the embroidery file.
2. Stitch Direction Creates Structure and Visual Quality
Stitch direction is another major factor behind professional-looking embroidery.
Imagine a large embroidered shape filled with stitches. If every part of that shape is stitched in the same direction, the design may appear flat or visually unbalanced.
Changing stitch direction can help create:
- Better visual definition
- More natural shapes
- Improved texture
- Better coverage
- More attractive light reflection
- Greater dimensional appearance
For example, a digitizer may change stitch angles within different parts of a logo to follow the shape of the artwork.
This is one of the details that may not be obvious when looking at the finished embroidery, but it can make a significant difference.
3. Underlay Provides the Foundation
Underlay is the foundation stitching placed underneath the visible stitches.
Think of it as the structural base of the embroidery.
It can help:
- Stabilize the fabric
- Support top stitches
- Reduce distortion
- Improve registration
- Prevent stitches from sinking into fabric
- Create a stronger foundation
Different fabrics and design elements may require different underlay approaches.
A lightweight fabric may need additional support, while a firm material may require less.
If the underlay is poorly planned, the top stitching may not sit correctly, resulting in an uneven or poorly defined design.
4. Pull Compensation Helps Prevent Gaps
One of the interesting characteristics of embroidery is that stitches can pull the fabric and surrounding stitches in different directions.
When dense stitches are placed into fabric, the embroidered area can become slightly narrower in one direction.
This can create unwanted gaps between design elements.
Pull compensation is used during digitizing to account for this expected movement.
Proper compensation can help maintain:
- Clean edges
- Consistent shapes
- Better registration
- Closed lettering
- Improved overall definition
Without appropriate compensation, a design that looks perfect on screen may produce visible gaps after stitching.
5. Stitch Sequencing Affects the Final Appearance
Embroidery is not simply about deciding which stitches to use. The order in which those stitches are sewn matters too.
A professional digitizer carefully plans the stitching sequence.
Good sequencing can help:
- Reduce unnecessary jumps
- Minimize thread trims
- Improve registration
- Control fabric movement
- Prevent certain elements from being distorted
- Make production more efficient
Poor sequencing can cause parts of a design to shift before other elements are embroidered.
This is particularly important for detailed logos and designs containing multiple overlapping elements.
6. Choosing the Right Stitch Type
Different areas of artwork require different stitch structures.
Three common stitch categories are:
Running Stitch
Running stitches are commonly used for:
- Fine outlines
- Small details
- Thin lines
- Delicate design elements
Satin Stitch
Satin stitches are often used for:
- Lettering
- Borders
- Narrow shapes
- Clean edges
When properly digitized, satin stitches can produce a smooth and polished appearance.
Fill Stitch
Fill stitches are generally used for:
- Large shapes
- Background areas
- Broad sections of artwork
The fill pattern, density, angle, and underlay all influence the final appearance.
Using the wrong stitch type for an element can make the embroidery look rough, bulky, or unclear.
7. Design Size Matters More Than Many People Realize
A design that looks excellent at a large size may become unreadable when reduced.
This is especially common with logos containing:
- Small text
- Thin lines
- Tiny gaps
- Intricate details
- Small symbols
When artwork is reduced too far, the digitizer cannot simply shrink the stitches proportionally.
The design may need to be redigitized specifically for the smaller size.
This can involve:
- Removing unnecessary details
- Enlarging small elements
- Adjusting stitch types
- Changing density
- Modifying lettering
- Increasing spacing
Professional embroidery is often about adapting the artwork rather than simply resizing it.
8. Fabric Has a Major Impact on Embroidery Quality
Even a well-digitized design can behave differently on different materials.
A design embroidered on denim will not necessarily look identical when embroidered on a lightweight cotton T-shirt.
Different fabrics have different:
- Stretch levels
- Thickness
- Stability
- Surface textures
- Thread absorption
- Resistance to needle penetration
For example, stretchy fabrics require additional consideration because they can move during embroidery.
Towels and fleece can hide stitches beneath their textured surfaces.
Denim and canvas can support heavier embroidery because they are generally more stable.
Therefore, the embroidery file should be appropriate for the intended fabric.
9. Stabilization Works Together With Digitizing
Stabilizer supports the fabric during embroidery.
Even a professionally digitized design may produce poor results if the garment is not properly stabilized.
The appropriate stabilizer depends on the:
- Fabric
- Design density
- Garment construction
- Embroidery placement
- Type of embroidery
Stabilization helps prevent excessive fabric movement while the machine is stitching.
However, stabilizer is not a replacement for proper digitizing.
Both need to work together.
10. Thread Tension Can Affect the Final Result
Thread tension also influences embroidery quality.
Incorrect tension can contribute to:
- Uneven stitches
- Loops
- Thread showing where it shouldn’t
- Poor coverage
- Unbalanced appearance
The digitizing file and machine settings should work together.
A properly digitized design provides a strong foundation, but the embroidery machine must also be correctly maintained and calibrated.
Why the Original Artwork Isn’t Enough
A logo that looks perfect on a computer screen may not produce perfect embroidery. Digital artwork and embroidery work in very different ways. A screen can display extremely thin lines, tiny text, smooth gradients, and complex details that a needle and thread cannot reproduce exactly.
Professional embroidery digitizing transforms artwork into a stitch structure specifically designed for fabric, thread, and machine limitations. The goal isn’t simply to convert an image, but to interpret the artwork for embroidery.
Why Automatic Digitizing Often Produces Messy Results
Automatic digitizing can work for simple designs, but complex logos often require professional adjustments. Automated tools may not correctly determine:
- Which design elements need priority
- Where compensation is required
- The correct stitch direction
- How small text should be handled
- How different areas should overlap
- The most effective stitch sequence
A file can technically be an embroidery file without being production-ready. Professional digitizing requires technical knowledge and careful adjustment.
Common Signs of Poorly Digitized Embroidery
Poor digitizing can become obvious once the design is stitched. Common problems include:
Uneven Edges
Shapes and lettering may appear rough or poorly defined.
Visible Gaps
Incorrect registration or compensation can leave unwanted spaces between design elements.
Excessive Puckering
Too much density or inadequate stabilization can distort the fabric.
Unreadable Text
Small lettering may lose clarity when converted into stitches.
Heavy and Stiff Embroidery
Excessive stitching can make a design unnecessarily bulky.
Uneven Coverage
Some areas may look dense while others appear thin or incomplete.
These issues are often caused by the embroidery file rather than the original artwork.
Why Test Stitching Is So Important
A digital preview cannot always show how a design will behave on actual fabric. A test stitch-out can reveal problems with density, registration, sizing, underlay, fabric movement, and thread coverage.
Testing the design on the intended or a similar fabric helps ensure that the final embroidery is clean, accurate, and production-ready.
How Professional Digitizers Improve an Embroidery Design
A professional digitizer evaluates a design from several perspectives:
- Visual: Does the embroidery look clean and attractive?
- Technical: Can the machine stitch it reliably?
- Fabric: Can the material support the design?
- Production: Can it be embroidered efficiently?
- Durability: Will it maintain its appearance with normal use?
These considerations help transform artwork into a practical embroidery design.
Embroidery Quality Is About More Than Stitch Count
A higher stitch count does not automatically mean higher-quality embroidery. Too many stitches can increase thread consumption, production time, stiffness, and fabric distortion.
Professional digitizing focuses on using the right number of stitches in the right places. Stitch density should be selected according to the design, fabric, size, and application.
How to Prepare Your Logo for Professional Digitizing
Providing high-quality artwork makes the digitizing process easier. Useful formats include:
- AI
- EPS
- SVG
- High-resolution PNG
- High-resolution JPG
Vector artwork is especially useful because it provides clean, scalable shapes. However, even high-quality artwork still needs to be professionally interpreted for embroidery.
Choosing the Right Embroidery File Format
Different embroidery machines use different file formats. Common formats include:
- DST
- PES
- EXP
- JEF
- VP3
- HUS
- XXX
- EMB
The correct format depends on your embroidery machine or software. Providing the required format helps ensure the final file is ready for your specific setup.
What Makes Professional Embroidery Look Premium?
Premium embroidery is usually the result of several elements working together:
- Clean digitizing for accurate stitch placement
- Proper stitch density for balanced coverage
- Correct underlay for a stable foundation
- Pull compensation to reduce gaps and distortion
- Good sequencing for better registration and efficiency
- Suitable stitch types for different design elements
- Correct sizing for the intended application
- Proper stabilization to control fabric movement
When these factors are carefully managed, embroidery can look significantly cleaner, sharper, and more professional.
Why Professional Embroidery Digitizing Is Worth It
A poorly prepared embroidery file can result in wasted garments, extra production time, excessive thread usage, rework, and inconsistent branding.
Professional digitizing helps create more reliable and consistent embroidery, especially for logos used on uniforms, promotional clothing, caps, jackets, merchandise, and other branded products.
How ASH Digitizing Helps Create Better Embroidery Files
At ASH Digitizing, we don’t treat embroidery digitizing as simple image conversion. Each design is carefully considered according to its artwork, size, fabric, application, and production requirements.
Our approach focuses on:
- Professional stitch planning
- Appropriate stitch density
- Clean stitch direction
- Effective underlay
- Pull compensation
- Proper sequencing
- Detail optimization
- Machine-ready embroidery files
- Fabric-specific requirements
- Production-friendly embroidery
Whether you need a company logo, custom artwork, lettering, cap design, uniform branding, or jacket embroidery, our goal is to create a file that produces clean, reliable, and professional results.
Final Thoughts
The difference between sharp embroidery and messy embroidery often begins before the first stitch is sewn.
An embroidery machine can only follow the instructions contained in the embroidery file. If those instructions are poorly structured, even an excellent machine may produce disappointing results.
That’s why embroidery digitizing is one of the most important stages of the embroidery process. Stitch density, stitch direction, underlay, pull compensation, sequencing, design size, fabric, stabilization, and machine settings all contribute to the final result.
The best embroidery designs aren’t simply converted from artwork. They are carefully engineered for thread, fabric, and machine performance.
So, when one embroidered logo looks exceptionally sharp while another looks messy or amateur, don’t just look at the machine.
Look at the digitizing.
At ASH Digitizing, we turn artwork into professionally structured embroidery files designed to stitch cleanly, accurately, and consistently. Because great embroidery starts with great digitizing.