Buy Digitizing Bundles and Save MoreBuy Digitizing Bundles and Save MoreBuy Digitizing Bundles and Save MoreBuy Digitizing Bundles and Save MoreBuy Digitizing Bundles and Save MoreBuy Digitizing Bundles and Save MoreBuy Digitizing Bundles and Save MoreBuy Digitizing Bundles and Save MoreBuy Digitizing Bundles and Save MoreBuy Digitizing Bundles and Save MoreBuy Digitizing Bundles and Save MoreBuy Digitizing Bundles and Save MoreBuy Digitizing Bundles and Save MoreBuy Digitizing Bundles and Save MoreBuy Digitizing Bundles and Save MoreBuy Digitizing Bundles and Save MoreBuy Digitizing Bundles and Save MoreBuy Digitizing Bundles and Save MoreBuy Digitizing Bundles and Save MoreBuy Digitizing Bundles and Save More
Buy Digitizing Bundles and Save MoreBuy Digitizing Bundles and Save MoreBuy Digitizing Bundles and Save MoreBuy Digitizing Bundles and Save MoreBuy Digitizing Bundles and Save MoreBuy Digitizing Bundles and Save MoreBuy Digitizing Bundles and Save MoreBuy Digitizing Bundles and Save MoreBuy Digitizing Bundles and Save MoreBuy Digitizing Bundles and Save MoreBuy Digitizing Bundles and Save MoreBuy Digitizing Bundles and Save MoreBuy Digitizing Bundles and Save MoreBuy Digitizing Bundles and Save MoreBuy Digitizing Bundles and Save MoreBuy Digitizing Bundles and Save MoreBuy Digitizing Bundles and Save MoreBuy Digitizing Bundles and Save MoreBuy Digitizing Bundles and Save MoreBuy Digitizing Bundles and Save More
Embroidery Digitizing Explained: How Logos Are Converted Into Stitch Files

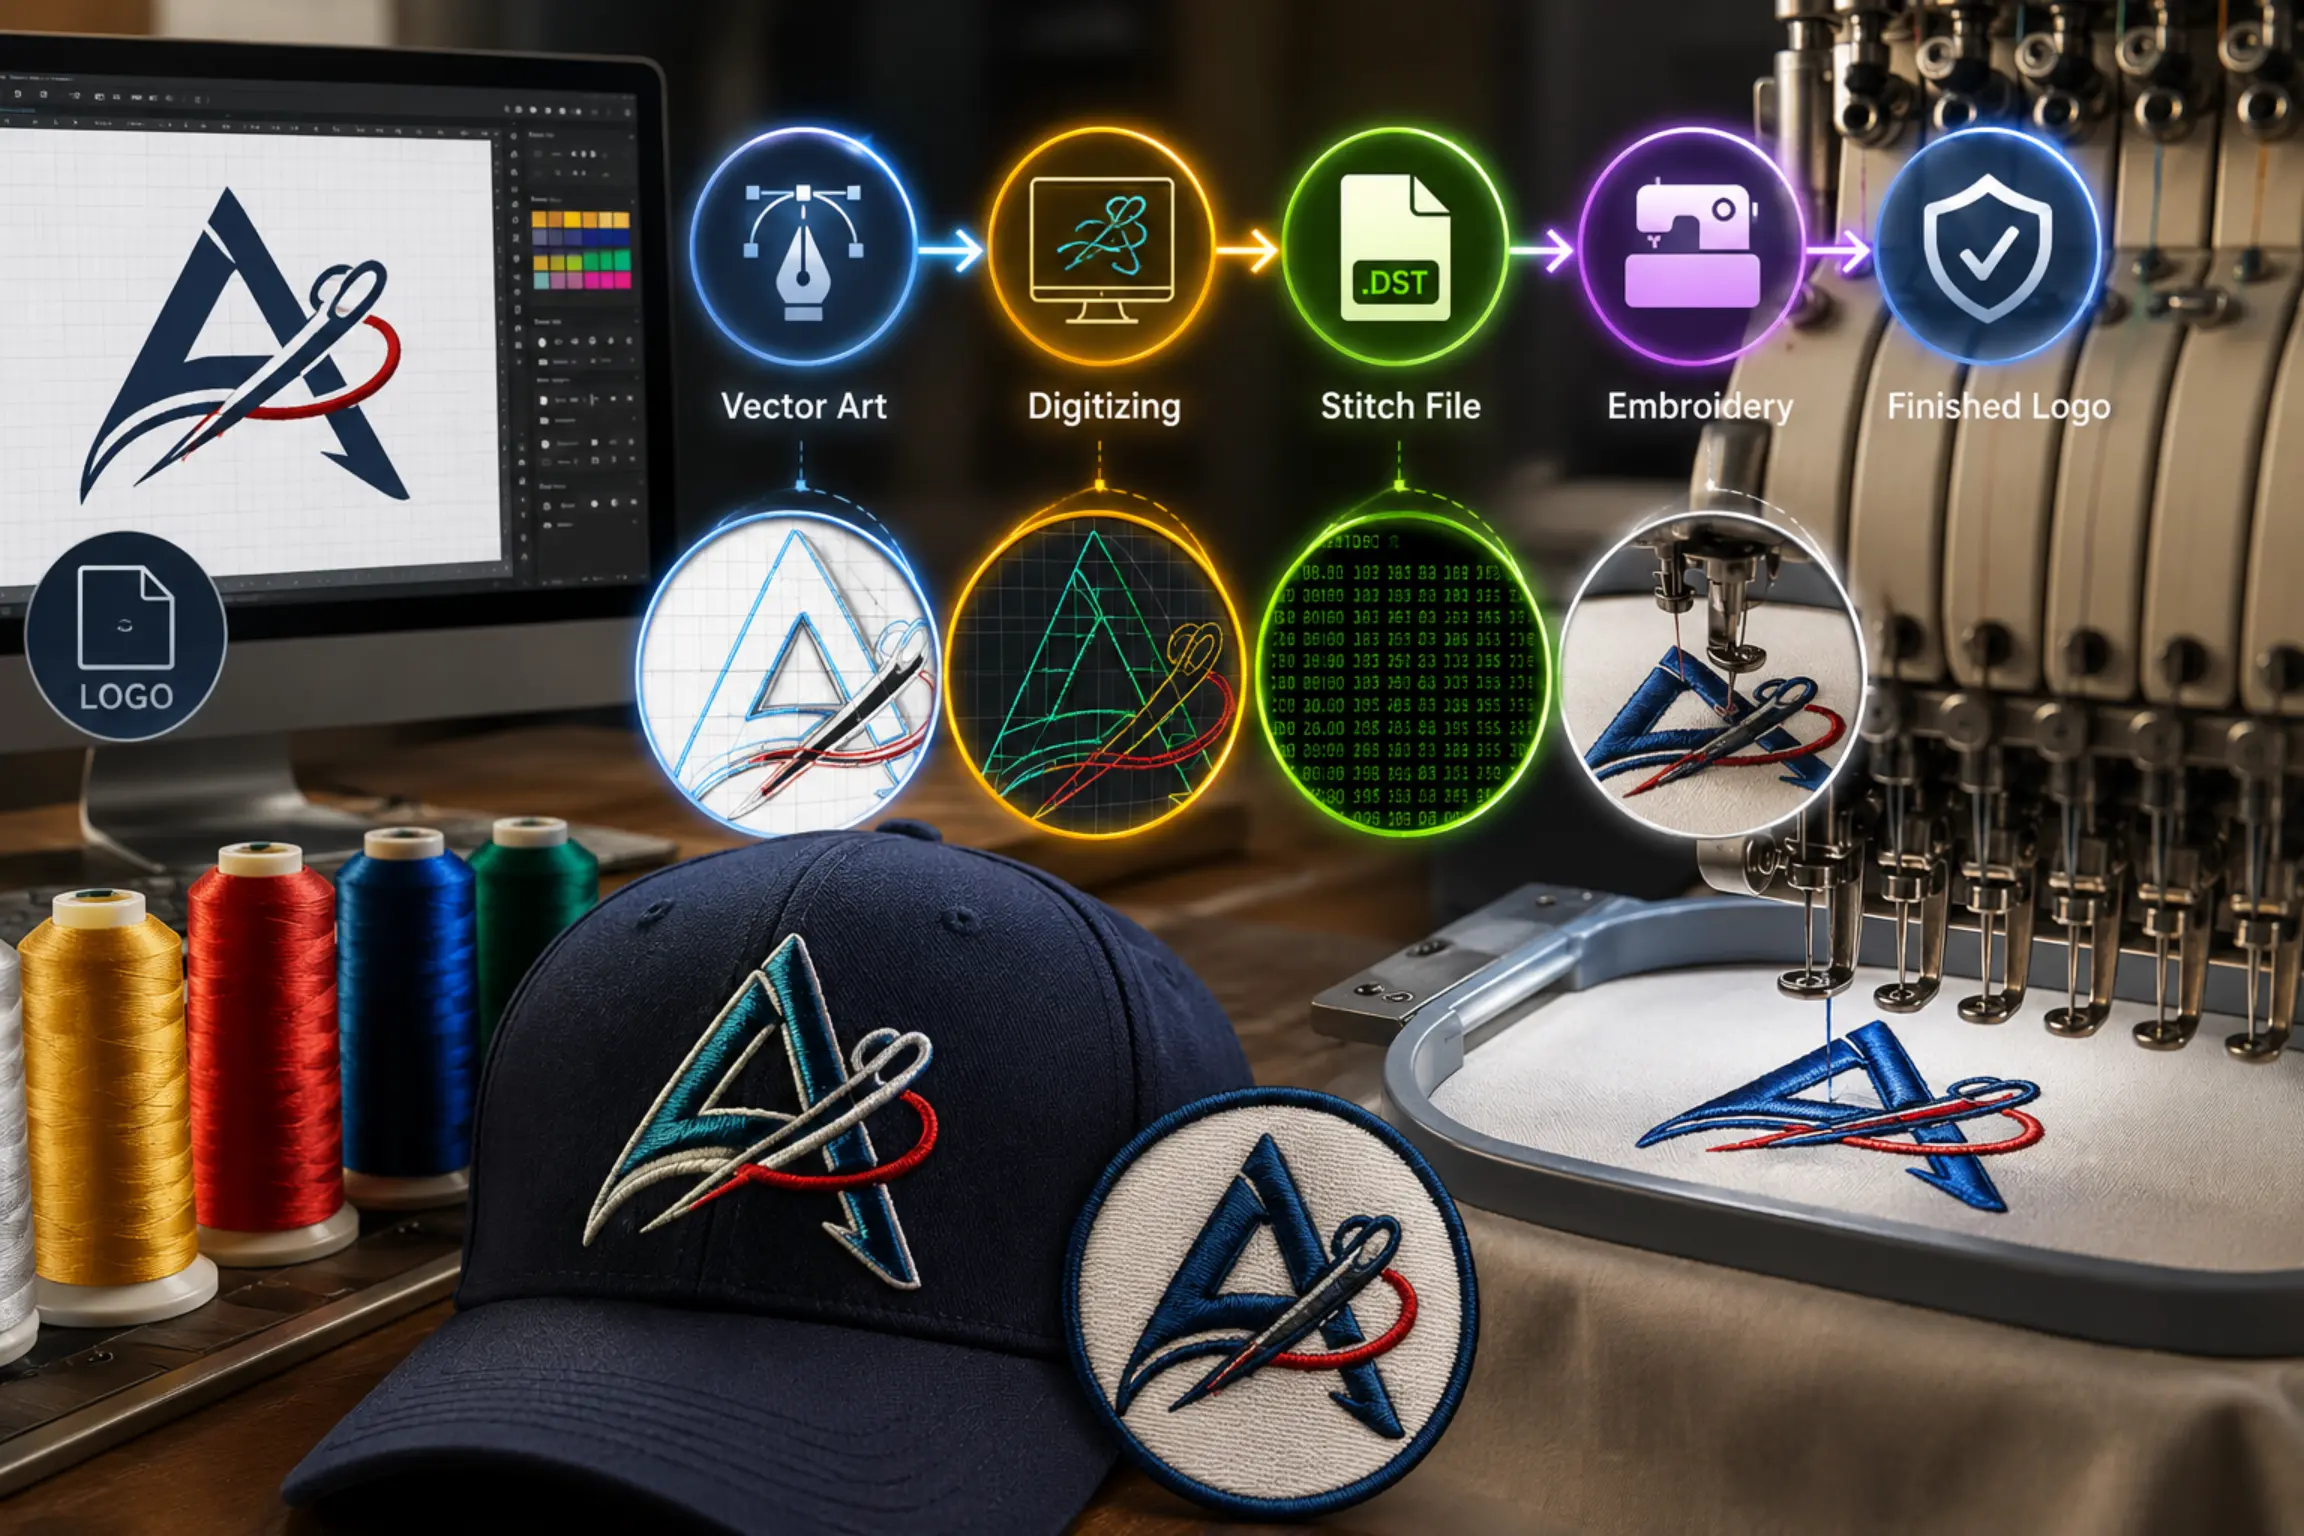
A professional embroidered logo starts long before the embroidery machine begins stitching. Before a logo can be embroidered onto a shirt, cap, jacket, uniform, bag, or other product, it needs to be converted into a specialized embroidery file. This process is known as embroidery digitizing.
Embroidery digitizing transforms artwork, logos, lettering, and graphics into a set of precise stitch instructions that an embroidery machine can understand. The digitizer decides how every part of the design should be stitched, including stitch types, stitch direction, density, underlay, sequencing, thread colors, and other technical settings.
At ASH Digitizing, we specialize in professional embroidery digitizing, helping businesses, clothing brands, embroidery companies, and individuals turn their artwork into clean, production-ready embroidery files.
What Is Embroidery Digitizing?
Embroidery digitizing is the process of converting digital artwork into a machine-readable embroidery file.
A JPG, PNG, PDF, AI, EPS, or SVG file tells you what a logo looks like. An embroidery file tells the embroidery machine how to recreate that logo using thread.
For example, a digital logo may contain text, borders, shapes, and multiple colors. A digitizer must decide whether each element should be created using a running stitch, satin stitch, fill stitch, or another embroidery technique.
The digitizer also determines the order in which each element will be stitched and how the design should behave on the intended fabric.
This means embroidery digitizing is not simply “converting an image.” It is the process of engineering artwork specifically for embroidery.
How a Logo Is Converted Into an Embroidery File
The logo-to-embroidery process generally involves several important stages.
1. Artwork Evaluation
The first step is examining the original artwork.
The digitizer looks at the logo’s shapes, colors, outlines, lettering, fine details, negative spaces, and overall complexity.
The intended embroidery application is also important. A design intended for a polo shirt may require different settings from one intended for a cap, jacket, hoodie, towel, or stretch garment.
2. Artwork Preparation
The artwork may need to be cleaned or simplified before digitizing.
Unnecessary details, low-resolution edges, complicated shapes, or very small elements may need to be adjusted.
A vector file such as AI, EPS, or SVG can be helpful because it provides clean shapes, but even vector artwork still needs to be professionally converted into embroidery stitches.
3. Determining the Correct Size
Embroidery designs are not infinitely scalable.
A logo designed for a large jacket may not work correctly when reduced to a small left-chest design. Small lettering and fine details can disappear when a design becomes smaller.
Professional digitizing takes the final embroidery size into consideration from the beginning.
4. Choosing Stitch Types
Different parts of a logo require different stitch structures.
Running stitches are commonly used for thin lines, outlines, borders, and fine details.
Satin stitches are ideal for lettering, narrow columns, borders, and smooth outlines.
Fill stitches are generally used to cover larger areas of a design.
Choosing the right stitch type helps create better coverage, texture, durability, and visual quality.
Understanding Stitch Density
Stitch density refers to how closely stitches are placed within an embroidered area.
Too little density can leave gaps and allow the fabric to show through. Too much density can make the design unnecessarily heavy, stiff, bulky, and time-consuming to stitch.
The correct density depends on factors such as:
- Fabric type
- Stitch type
- Design size
- Thread
- Underlay
- Garment construction
Professional digitizing is about finding the right balance rather than simply adding more stitches.
What Is Underlay in Embroidery?
Underlay is a foundation layer of stitches placed beneath the visible embroidery.
It helps stabilize the fabric, support the top stitches, improve coverage, and maintain the shape of the design.
Different designs may require different underlay structures, including center-run, edge-run, zigzag, or contour underlay.
The correct underlay depends on the object being embroidered and the fabric being used.
What Is Pull Compensation?
Embroidery can cause fabric and stitches to move or pull as the needle penetrates the material.
Pull compensation is used to account for this movement and help the finished embroidery maintain the intended shape.
Without appropriate compensation, lettering and other elements may appear narrower or distorted after stitching.
A professional digitizer anticipates how the design will behave once it is actually embroidered.
Why Stitch Direction Matters
Stitch direction affects the appearance, texture, and overall visual quality of embroidery.
Changing stitch directions between different sections can help define shapes and create visual separation.
For example, a leaf or curved object may look more natural when its stitches follow the shape rather than all running in the same direction.
Stitch direction can also influence how the fabric responds to the embroidery.
Why Stitch Sequence Is Important
An embroidery machine stitches a design in a specific order.
A professionally digitized design may be organized so that the machine completes foundation stitches first, followed by larger elements, borders, details, and lettering.
Good sequencing can reduce unnecessary jumps and trims, improve registration, reduce production time, and create a cleaner final result.
Poor sequencing can result in unnecessary thread movement, excessive trims, overlapping problems, and alignment issues.
Why Fabric Matters
The same embroidery file may not produce identical results on every fabric.
Cotton, polyester, denim, fleece, canvas, twill, jackets, hoodies, sportswear, towels, and stretch garments all behave differently during embroidery.
For example, stretchy fabrics may require additional stabilization, while thick or textured materials may require different density and underlay settings.
This is why professional digitizers consider the intended fabric whenever possible.
Embroidery Digitizing for Caps and Hats
Caps are more challenging than flat garments because of their curved surface and construction.
The cap’s center seam, crown structure, available embroidery area, and direction of stitching can all affect the final result.
Cap designs often require specialized sequencing and stitch direction to achieve clean embroidery.
A design that works perfectly on a flat shirt may need modifications before it can be used successfully on a cap.
Embroidery Digitizing for Small Text
Small lettering is one of the most difficult areas of embroidery digitizing.
Text that looks perfectly clear on a computer screen may become unreadable once stitched.
Thin lines can disappear, spaces can close, and letters can merge together.
Professional digitizing may require adjustments to:
- Letter size
- Stitch type
- Density
- Spacing
- Underlay
- Pull compensation
- Character shapes
Sometimes small text must be slightly modified to remain readable while preserving the overall branding.
Common Embroidery File Formats
After digitizing, the design is exported into a format compatible with the embroidery machine.
Common embroidery formats include:
DST – widely used in commercial embroidery.
PES – commonly associated with Brother embroidery machines.
EXP – used by various professional embroidery systems.
JEF – commonly associated with Janome machines.
VP3 – commonly used with Pfaff and Husqvarna Viking systems.
HUS – associated with certain Husqvarna Viking machines.
XXX and SEW – also used by various embroidery systems.
The correct format depends on the embroidery machine or software being used.
Why Vector Artwork Is Helpful
Vector artwork such as AI, EPS, and SVG can be extremely useful because it provides clean, scalable shapes.
However, vector artwork is not automatically an embroidery file.
A vector circle, for example, still needs to be converted into an appropriate stitch structure.
Depending on its size and purpose, it could become a running stitch, satin border, fill object, or combination of multiple stitch types.
Manual Digitizing vs Auto-Digitizing
Automatic digitizing software can convert artwork into stitches quickly, but automatic conversion does not always produce production-quality embroidery.
Automated systems may create problems such as:
- Incorrect stitch density
- Poor sequencing
- Excessive stitch count
- Weak small lettering
- Unnecessary trims
- Poor registration
- Inappropriate stitch types
Professional manual digitizing allows an experienced digitizer to consider the artwork, fabric, size, machine, stitch structure, and production requirements together.
For professional logos and commercial embroidery, this difference can have a major impact on the final result.
Common Problems Caused by Poor Digitizing
Poor digitizing can cause several embroidery problems.
Puckering
Fabric may gather or wrinkle around the design because of excessive density, poor stabilization, unsuitable underlay, or fabric movement.
Thread Breaks
Thread breaks can have several causes, including machine settings, needle and thread issues, tension, and problematic stitch structures.
Gaps
Insufficient coverage or fabric movement can cause unwanted gaps in the embroidered design.
Poor Lettering
Small or poorly structured lettering can become distorted or unreadable.
Uneven Satin Stitches
Incorrect stitch direction, width, density, or underlay can make satin stitching appear rough or inconsistent.
Excessive Stitch Count
Too many unnecessary stitches can increase production time and thread consumption without improving the final appearance.
What Is Stitch Count?
Stitch count refers to the approximate number of stitches contained in an embroidery design.
Larger and more detailed designs usually require more stitches.
However, more stitches do not automatically mean better quality.
Professional digitizing focuses on using the appropriate number of stitches to achieve good coverage, durability, appearance, and production efficiency.
How Stitch Count Affects Cost
Higher stitch counts can increase:
- Machine running time
- Thread consumption
- Production time
- Number of needle penetrations
For businesses producing large quantities, efficient digitizing can help reduce unnecessary production costs.
This is why professional digitizing should balance quality with stitch efficiency.
Can Embroidery Designs Have Gradients?
Embroidery does not reproduce digital gradients exactly like a computer screen.
A digitizer may recreate the appearance of a gradient using different thread colors, stitch directions, density changes, or blending techniques.
Highly detailed artwork may therefore need some artistic adaptation to work effectively with thread.
What Is 3D Puff Embroidery?
3D puff embroidery uses foam underneath the stitches to create a raised, dimensional appearance.
It is especially popular for:
- Caps
- Hats
- Streetwear
- Sportswear
- Bold lettering
- Fashion branding
3D puff requires specialized digitizing because the digitizer must account for foam thickness, stitch coverage, object edges, and how the foam will be removed after stitching.
What Is Appliqué Digitizing?
Appliqué uses fabric pieces as part of an embroidered design.
Instead of covering an entire large area with thread, fabric is placed within the design and secured using embroidery stitches.
Appliqué can help reduce stitch count while creating a distinctive appearance and is commonly used for sportswear, jackets, uniforms, and large designs.
Why Professional Embroidery Digitizing Matters
A good embroidery machine can only follow the instructions contained in the embroidery file.
If the file is poorly constructed, the machine cannot automatically fix problems with density, sequencing, lettering, stitch direction, or compensation.
Professional digitizing can improve:
- Overall appearance
- Stitch quality
- Letter readability
- Registration
- Fabric interaction
- Production efficiency
- Thread usage
- Design durability
This is why the quality of the digitized file is just as important as the embroidery machine itself.
How ASH Digitizing Creates Professional Embroidery Files
At ASH Digitizing, we understand that professional embroidery digitizing is much more than converting an image into stitches.
We carefully analyze the artwork, consider the intended size and application, select suitable stitch structures, optimize density and underlay, organize stitch sequencing, and pay attention to small details that can affect the final embroidered result.
Our goal is to create clean, accurate, professional, production-ready embroidery files that look great when stitched onto real garments and products.
Whether you need a company logo, cap design, jacket embroidery, lettering, promotional artwork, sports design, or a more detailed logo, ASH Digitizing focuses on quality and practical embroidery performance.
How to Prepare Your Logo for Digitizing
When sending artwork to a digitizer, providing the following information can make the process easier:
- Original logo or artwork
- Vector file if available
- Desired embroidery size
- Garment or fabric type
- Embroidery placement
- Thread colors
- Required file format
- Embroidery machine information
- Any special instructions
For example, a digitizer will produce a more appropriate design when they know whether the logo is intended for a 4-inch left-chest polo, a cap, or a large jacket back.
Why Test Stitching Is Important
A digital embroidery preview can show how a design is expected to look, but actual thread and fabric can behave differently.
Test stitching can reveal issues such as:
- Puckering
- Poor registration
- Incorrect density
- Weak coverage
- Small lettering problems
- Thread breaks
- Fabric interaction
For important commercial designs, test stitching can help identify areas that need further optimization before large-scale production.
Frequently Asked Questions
What is embroidery digitizing?
Embroidery digitizing is the process of converting artwork or logos into a machine-readable file containing detailed stitch instructions.
Can I digitize a JPG or PNG logo?
Yes. Professional digitizers can often work from JPG, PNG, PDF, or other artwork formats. Vector files such as AI and EPS can make the process easier when available.
What is the most common embroidery file format?
DST is one of the most widely used formats, particularly for commercial embroidery machines. However, the correct format depends on the machine being used.
Can every logo be embroidered?
Most logos can be digitized, but highly detailed artwork, gradients, photographs, and very small designs may need to be simplified or adapted for embroidery.
Can I resize an embroidery file?
Embroidery files should not always be resized dramatically because stitches do not scale like vector graphics. Significant size changes may require additional editing or re-digitizing.
Does higher stitch count mean better quality?
No. A higher stitch count does not automatically produce better embroidery. Efficient and properly structured stitching is more important.
Why does embroidery pucker?
Puckering can be caused by excessive density, insufficient stabilization, poor underlay, fabric movement, tension problems, or unsuitable digitizing.
Why does my small text look bad?
Small embroidery lettering has physical limitations. The design may need adjustments to its size, spacing, stitch type, density, or letter structure.
Final Thoughts
Embroidery digitizing is the essential link between a digital logo and a finished embroidered product.
A logo may look perfect on a computer screen, but turning that artwork into beautiful embroidery requires careful decisions about stitch types, density, underlay, pull compensation, stitch direction, sequencing, fabric, size, and machine compatibility.
Professional digitizing ensures that the artwork is not simply converted into stitches but is properly engineered for embroidery.
At ASH Digitizing, we focus on creating high-quality, production-ready embroidery files designed to deliver clean, accurate, and professional results. From simple business logos to detailed artwork, caps, jackets, uniforms, and promotional products, our goal is to make the transition from digital artwork to real thread as seamless as possible.
Great embroidery starts with great digitizing — and ASH Digitizing is here to turn your artwork into embroidery that looks professional, clean, and built to last.